Do you want to know the easiest way to read a ruler? Reading a ruler may be difficult at first, but with repetition, it will become second nature.
The easiest way to read a ruler is to understand its markings and units of measurement.
A young student struggled to read a ruler, so her teacher gave her a simple tip. “Just remember that the big numbers represent inches, and the little lines represent fractions of an inch.” From then on, reading a ruler was a breeze for the student.
Let me show you: What is the easiest way to read a ruler?
Here we go
Familiarity with non-standard measures makes it simple to grasp standard units, and knowing how to use a ruler is vital for precise measurements in schools and everyday life. For instance, if you want to build anything out of paper, you will need a ruler to determine the material you need.
Different types of rulers exist, all serving the same measuring function; certain professions, including physics, architecture, and engineering, call for the usage of particular rulers. While some rulers have numerous scales, all have uniform markings that allow anybody acquainted with the measuring system to use them effectively.
Using a Ruler
Show pupils how to use a ruler properly by using a ruler that has been blown up and displayed on a screen for everyone to see. Students should be taught, for instance, that the measurement should always begin at the “zero mark.” If at all feasible, display several rulers to help children understand that sometimes the zero mark is at the end of the ruler. At the same time, other times, there is a tiny gap before the readings begin. Students use the number on the ruler to determine the measurement, starting with zero marks.
The Damaged Ruler
It may be difficult for pupils to comprehend a broken ruler or one whose edge has deteriorated to the point where the measurement is wrong. They need to look at the ruler’s size to get the answer. They must instead deduct the number from the initial value. For instance, the item is six units long if the student aligns it from the “1” mark to the “7” mark. Students may complete this task without subtraction by counting the units along the ruler. To avoid the error of measuring the beginning point, Professional Development for Busy Educators advises pupils to depend on the gaps rather than the markings.
Hands-On
Once kids can read a ruler, you may give them measuring tools and paper to write down their findings. Start with goods that come in whole units to make this simple. Then, children may measure items in half-or-quarter-unit increments as they get more comfortable using the ruler. Once the kids have practiced measuring, another exercise is to have them practice estimating by giving them a task to locate items in the classroom with specific dimensions.
What is the most straightforward method to learn how to read a ruler?
Give each child a sheet, and tell them to use the ruler to cut along the lines. Stress that the item should be measured at these intervals and that each segment is one inch, precisely as shown on their ruler, once the sections have been cut out.
How can a youngster learn to read a ruler?
A youngster can learn to read a ruler if she can count. Start by connecting the number lines on large sheets of paper. Next, allow the youngster to mark locations on the number line and write the numbers above those markings in sequence.
How old must you be to learn how to read a ruler?
Students start learning about standard units of measurement in second grade. Next, they measure distances in imperial and metric units using rulers, yardsticks, and other instruments.
How old should a kid be before they can use a ruler?
Before the age of 8, children are often not able to unite. Therefore, it is crucial for young children learning to measure units to have the capacity to do so without interfering with or overlapping the branches.
How to read a ruler lesson plan?
As a teacher, I’ve started teaching my pupils how to measure objects according to custom. We always want to presume that our students have learned the relevant material from the previous grade level.
For instance, students should have learned to read a ruler to the nearest quarter inch in the fourth grade. I immediately understood they didn’t know how to read a ruler or where to start reading one.
I began to search my memory for a quick method to impart the talent without spending too much time on it.
By counting the lines and designating each line as a fraction, the anchor chart helps the learner identify each line on the ruler.
For instance, if a ruler has 16 lines, and a pupil guesses the eighth line, they have estimated half an inch. Since 8 is half of 16, they understand that the eighth line is a half-line, making this a half-inch.
After learning the five traits, my pupils found reading a ruler and taking accurate measurements much simpler.
How to read ruler marks?
Learn more about reading ruler.
You can be instructed to measure the object in centimeters if it is longer than 10 or 20 millimeters. As previously mentioned, this is accomplished by counting along with the centimeter markers on the ruler.
Write down how many centimeters you have measured, followed by a decimal point, until you have reached the centimeter mark closest to your item’s edge (but do not go beyond it).
Next, determine the number of millimeter markings between the last centimeter mark and the object’s measured edge.
For example, if you counted up to 10 millimeters, you would have reached the following centimeters (the answer will be nine or less). Right off the decimal point, enter this new number. Your centimeter measurement will be the response.
So, for instance, if you measure an item 4 cm long and then another 3 cm, its total length will be 4.3 cm.
What are the uses of rulers in drawing?
Other tools, in addition to the basic materials, will make drawing more straightforward and more pleasurable for you.
Straightedge
A straight edge will give you clean, exact lines when your topic is technical and demands accuracy. But in a rough drawing, the accuracy of a straightedge would seem strange. So, instead, use the straightedge during the sketching stage with a light pencil line to get straightedge accuracy without the tightness, and then draw over those lines more strongly freehand during the drawing stage.
Triangle
A triangle may be simple to draw straight lines since it has more surface area to hold and is more critical than a ruler.
T-Square
You can draw more accurate vertical, horizontal, and diagonal lines using a triangle on your board or drawing pad with a T-square attached to the side edge. This technique works well for sketching complex objects in linear perspectives, such as buildings.
Rule of Angles
An angle ruler is a tool that measures angles and folds down small enough to fit in a pencil box, which functions similarly to a ruler. To learn how to create arcs using this tool, turn to page 30.
Dividers
Dividers are employed to study and replicate proportions from a photograph or drawing. For information on utilizing common walls, turn to page 29.
Make angles
Essential Materials
• Graphite pencils in sizes 4H, HB, and 4B.
Sharpeners for pencils
sketching paper for teeth
• Drafting table
• Handheld eraser
• Vinyl white eraser
Optional But Important to Consider
• Angle, triangle, or straightedge ruler
Sewing gauge, dividers, or proportional divisions
little mirror
Shield for erasing
Extending a pencil
Knife of craft
Pad of sandpaper
T-square
Fixative
paper for tracing
tape masking
Triangles for Eraser and Erasing Shield Use in Drafting
Equivalent Dividers
To proportionately expand or minimize a picture, use a proportional divider.
Gauge for sewing
The proportions of still life, three-dimensional subject matter, or while working from flat reference materials like pictures may all be measured using a cheap sewing gauge.
Lamp Box
You may use a lightbox to work from a structural design instead of directly sketching guidelines on your drawing paper.
Little Mirror
For self-portraits and to study your face, use a tiny mirror. Additionally, it is helpful to see your artwork in reverse. For instance, seeing a backward drawing will let you perceive the composition with new eyes.
Fixative
The fixative spray is used. It is mainly used for powdery drawings made with carbon or charcoal. Since you’ll be using graphite for the demonstrations in this book, the fixative is not required. Graphite is unlikely to smudge if the drawings are placed freely and stacked on the other.
How do you read ruler measurements?
As you learn to read a ruler, you will undoubtedly encounter metric and English standard rulers. On some rulers, the metric scale is on one side, while the English system is on the other. What side you choose will depend on how you need to measure.
The way the inches are marked on English rulers is another problem. While some rulers have 1/16-inch marks, others have 1/8-inch markings per inch. Both will be covered in this piece.
Of the three, reading a metric ruler is the easiest. Centimeters are denoted on a metric ruler. Because a ruler there will often be 14 cm long. There are ten little measurements, known as millimeters, between each centimeter. One centimeter is equivalent to ten millimeters.
English rulers are more challenging to read. Start by calculating how many dashes or markings there are between each inch. Each print, for instance, is 1/8 inch thick if there are 8. Likewise, each design is 1/16th of an inch in size if there are 16.
Align the object you are measuring. Calculate the dashes after determining the total number of the whole cm using a metric ruler. For instance, the measurement is 4.3 centimeters if you add four complete centimeters and three lives.
If using a ruler with 1/8-inch markings, measure the entire inch first, then the 1/8-inch. With an English ruler, conversion is different. Every two-quarter inch, or two-inch mark, equals one-fourth of an inch. Always make the number simpler. Measure to the nearest 1/8 inch after aligning the object you want to check.
When using a 1/16, you may think of it as a 1/8-inch marked ruler. To simplify the measurement, align your object and measure to the closest 1/16 inch.
How do you read a PowerPoint using a ruler activity?
Although they get a lot of attention, the text is still essential in PowerPoint presentations. Presenters must keep in mind that the text, particularly in the case of corporate presentations, provides context for the slides. However, presenters must focus on essential words and phrases; they can read only some of the production. If the spacing needs to be corrected, the text might seem very bad. The ruler is one tool that might come in handy while altering the text.
How do you read a ruler in inches and decimals?
Rulers are a necessary tool, but if you need help reading one, you’re not the only one.
Decimal and fractional scales are the most common on rulers. Fractional rulers have fraction-based graduations or markers. On the other hand, graduations or marks on decimal rulers follow the decimal system and contain numbers such as 0.1, 0.01, and so on.
Although decimal rulers may be based on any measurement system, they are often based on the metric measurement system of millimeters, centimeters, and meters (mm, cm, and m) (m).
Inches-based decimal rulers typically feature graduations or markings of 0.1″ (1/10″) and 0.01″ (1/100)”, while some may additionally include 0.020″ (1/50″) graduations.
We depict a ruler with graduations or markings of 0.1″ (1/10″) and 0.01″ (1/100″) in the figure below.
You may often come across rulers who need a notation indicating which decimal of an inch is used on the scale. For instance, according to the ruler below, the minor graduation or mark is 0.01″ (1/100″), indicated by 100. The tiny gradation of an inch must be estimated if a ruler has no legend. Start by calculating the distance in inches between each graduation or mark. For instance, if there are 10, the small effect or graduation is 1/10″ or 0.1″. The tiny graduation or pattern is 1/100″ or 0.01″ in decimal, etc., if there are 100.
How do I teach my child to measure?
Tell children to use their feet, hands, or little measuring tools like magnetic tiles, buttons, or even candy bits to measure things around the home or school. Encourage kids to count the objects they use to measure an object’s size to determine its length or height.
Why do a ruler’s fine lines exist?
Centimeters are the long lines with numbers, while millimeters are the shortest. For example, I counted seven markings after a centimeter is 1.7 centimeters long since a millimeter is 1/10th of a centimeter.
What do a ruler’s points represent?
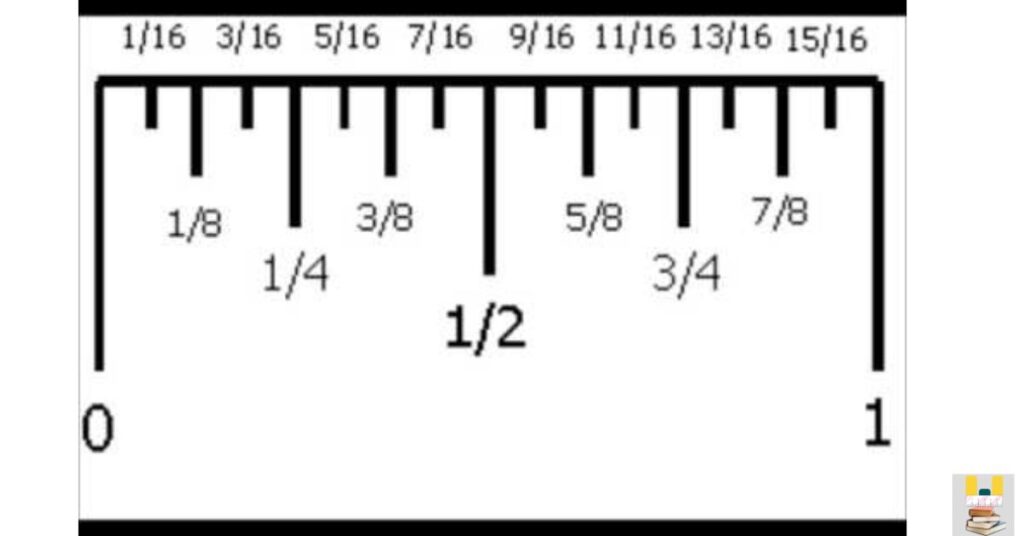
The marks of a standard ruler represent the fractions of an inch. The effects on a ruler from the beginning to the 1-inch mark are 1/16, 1/8, 3/16, 14, 5/16, 3/8, 7/16, 12, and so on.
How do you read a ruler in cm?
Examine the ruler’s metric side (on the opposite edge). Centimeter numerals from 1 to 30 are written on the ruler’s rhythmic side, from far left to far right. The ruler is 30.5 cm long when measured to the last metric point—the lines at each centimeter number that are the longest show the centimeters along the ruler’s edge.
How does a ruler’s millimeter scale work?
Find the ruler’s zero ends, then tally each mark along the edge. One millimeter, or mm, is represented by each dot; therefore, counting five beads is equivalent to measuring five millimeters, ten drops is equivalent to counting ten millimeters, and so on.
How is a metric ruler read?
According to a metric ruler, each line corresponds to one millimeter or one-tenth of a centimeter. It is important to note that the decimal point is shifted to the right from centimeters to millimeters.